by Baxter and Nina
Warrior 3 is the third pose in our upper body strengthening series because this pose provides unique upper body strengthening with no weight bearing on your hands. Last week, we featured the wall version of this pose (see Warrior 3 (Wall Version)), which makes it accessible to almost everyone. This week, we’re featuring the full pose. In the full pose, your back body muscles work more than when you’re at the wall, so the spinal extenders in your back and neck are strengthened even more.
As we said last week, Warrior 3 is unique in that in this pose you keep your torso and one leg parallel with the floor. In this position, gravity challenges you to keep yourself upright instead of folding over your front leg. All the musculature on the back of your body has to work actively to keep you in this position, including your hamstrings and buttocks along with all the spinal muscles up to the base of your neck. This week, we’re introducing three different arm variations for the pose, moving from the easiest to balance in to the most difficult. Each arm position strengthens different upper body muscles.
In Variation 1, with the arms back alongside the torso (a kind of Downward Flying Super Hero pose), the muscles you use to take your arms into extension (behind your back, as in Camel pose) are activated. These include the back part of your deltoids, your triceps muscles, and your lattissimus dorsi, as well as the muscles between your shoulder blades that help bring your shoulder blades close together. This variation provides a rare opportunity to strengthen muscles that don’t get much of a workout in your daily life, and it is also the easiest version to balance in.
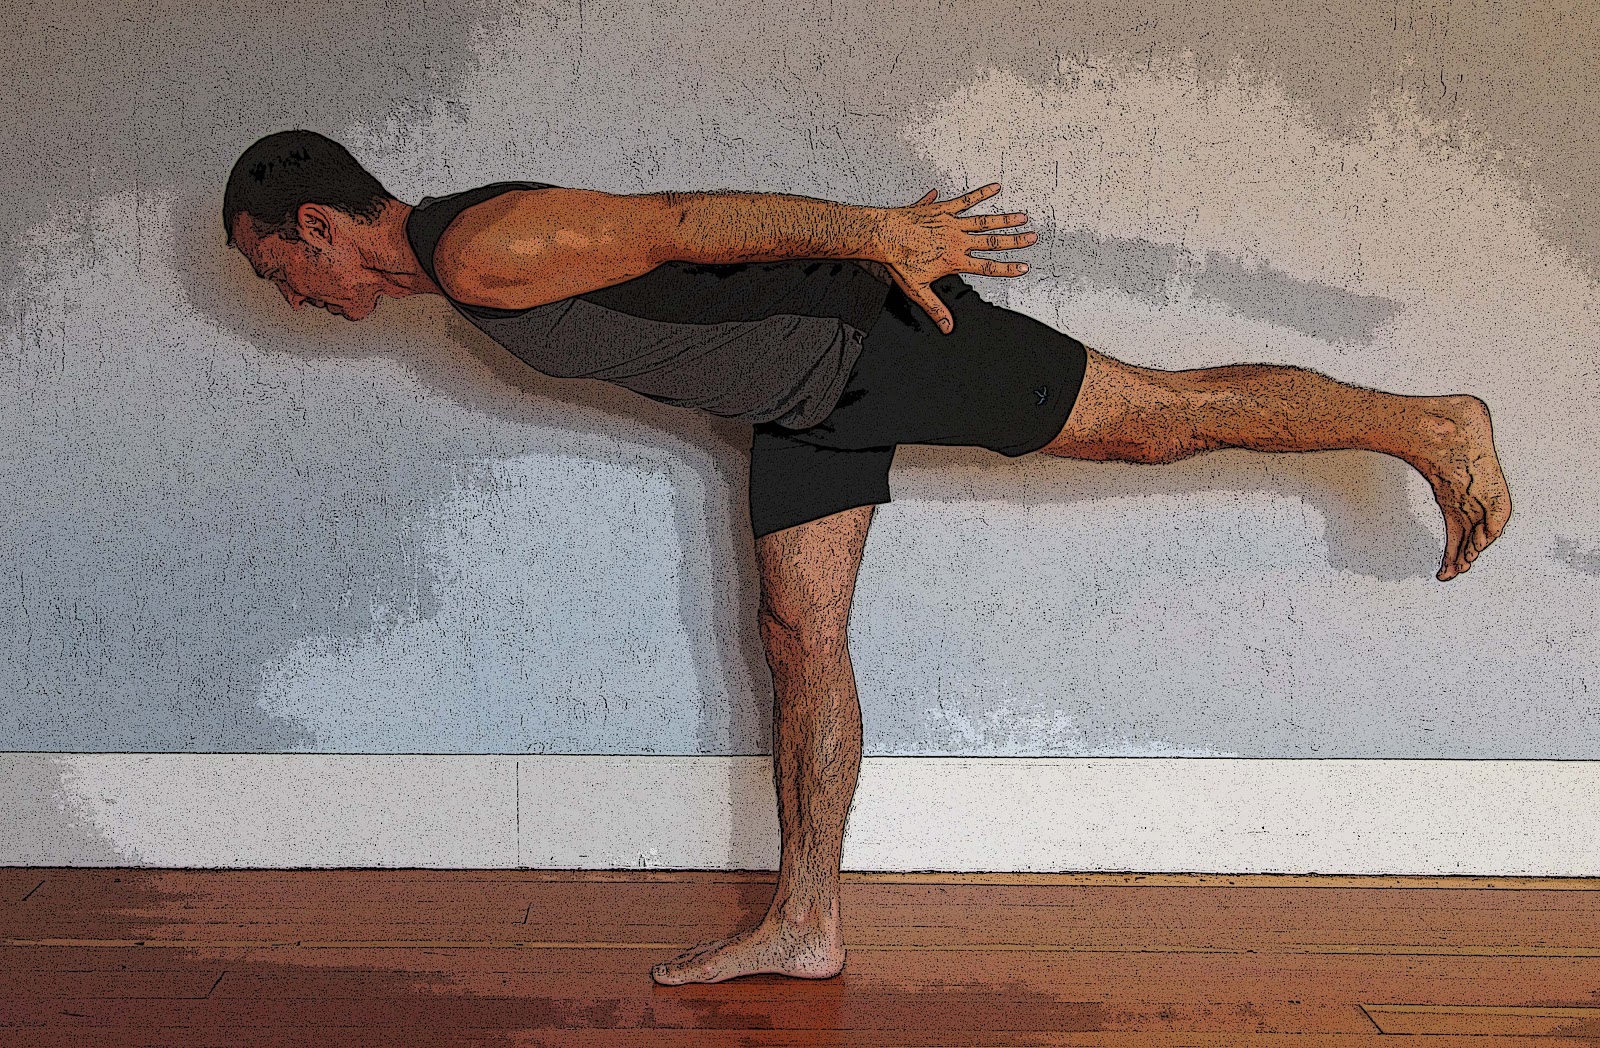
In Variation 2, with your arms out to the sides (it’s a plane!), your balance is challenged more than in Version 1, therefore your back body muscles get a more intense work out. With your arms out the your sides, you continue to use the backs of your deltoids, but you also activate the muscles between your shoulder blades even more (middle trapezius, rhomboids, etc.).
In Variation 3, the most challenging version to balance in, the fronts of your deltoid muscles, some of your rotator cuff muscles, and your shoulder blade stablizers are strengthened as keep you keep your arms overhead. Because your arms and upper body are resisting the downward pull of gravity, the trapezius, anterior and posterior deltoid, and serratus anterior muscles that are strengthened in the wall version get a more intense workout in the version away from the wall.
Of course, as a bonus, all three versions of Warrior 3 are also excellent for improving balance and for general strengthening of your standing leg and for strengthening the back leg muscles of your raised leg, including your hamstring muscles, which can become overstretched from certain other yoga poses.
Instructions:
Variation 1: Start by moving Warrior 1 pose on your right side (with your right foot forward). From there, bring your hands to your hips. Now tip your torso forward about 45 degrees over your hip joint and come onto the ball of your back foot. On an exhalation, straighten your right leg as you gently propel yourself forward to balance over it with your torso and back leg parallel with the floor. Try to keep both hips even with the floor. Once you have your balance established, bring your arms along side your body with the palms facing each other.
The position of the head of your head should be slightly turned up to face forward (as shown in the photo). This is easiest head position for balance. However, if this is too hard on your neck, try keeping your head aligned with the rest of the spine, with the crown facing forward. Stay in the pose for a couple of breaths, and work your way up to 30 seconds to a minute in the pose.
To come out of the pose, bend your right knee slightly, and bring your raised foot down to floor. Then swing your arms up into Warrior 1 pose, and release from there. Repeat on the left side.
Variation 2: For Variation 2, come into it the same way as version 1, with your hands on your hips. When you have your balance established, bring your arms out the sides, with your palms facing down.
Stay in the pose for a couple of breaths, and work your way up to 30 seconds to a minute in the pose. To come out of the pose, bend your right knee slightly, and bring your raised foot down to floor. Then swing your arms up into Warrior 1 pose, and release from there. Repeat on the left side.
Variation 3: For Variation 3, come into the same way as Variation 1 except you should leave your arms in Warrior 1 position as you come into full Warrior 3. However, if balance is a big issue, you can start with hands on the hips and then bring your arms forward when your balance is established.
Stay in the pose for a couple of breaths, and work your way up to 30 seconds to a minute in the pose. To come out of the pose, bend your right knee slightly, and bring your raised foot down to floor. Then swing your arms up into Warrior 1 pose, and release from there. Repeat on the left side.
Cautions: If you have low back pain, you may have to drop your lifted leg a bit lower or bend your back knee to reduce the weight stress this pose puts on your lower back (even a micro bend to the back leg can be helpful). If you have arthritis of the neck, you may want to avoid lifting your head to face forward. As always, use common sense. It if hurts to do the pose, come out and ask your teacher for some feedback about what you’ve been doing. If balancing is a big problem and you’re just getting frustrated, return the wall version we featured last week (see Warrior 3 (Wall Version)).
If you’re having a lot of trouble and want to work your way gradually into the pose, you can do the pose at an angle instead of parallel. For more tips, see Nina’s post on Taking on a Yoga Challenge.
Showing posts with label Warrior 3. Show all posts
Thursday, October 18, 2012
Monday, October 15, 2012
Taking on a Yoga Challenge
by Nina
A highlight of my week last week (at least from a yoga asana perspective) was getting up into handstand by myself again in my class. Although I was able to do handstand for a number of years, I lost the ability to do it due after some shoulder injuries (two frozen shoulders to be specific—who knew you could get that nasty condition more than once!). So I’ve had to go through the process three times of learning/re-learning to do this pose. The way I did it was by practicing the pose home. But how can you practice a pose that you can’t do? Well, I just made up my mind to try getting up into handstand several times a week. Just casually. Just one try. And if that didn’t work, no big deal. After I after finally got up once, still keep practicing. If I failed after that first success, again, no big deal. Just keep practicing. Just keep practicing. Just keep practicing. That’s basically the way I not only learned to do handstand, but also a number of other challenging poses. This process always reminds me of the main message of the Bhagavad Gita.
You have right to your actions,
but never to your actions’ fruits
Ac for the action’s sake.
And do not be attached to inaction.
Self-possessed, resolute, act
without any thoughts of results,
open to success or failure.
Taking an approach like this is one of the many ways your asana practice can teach you about yoga philosophy in action. And this approach to a difficult asana is one you can use for any challenging task that you take on.
But I decided to bring up this topic because this week Baxter and I will be featuring Warrior 3 pose, which is a very challenging balance pose (in fact, this is another one of the challenging poses that I practiced at home on a regular basis so I could become better at it). Do you think you can’t do Warrior 3? And do you want to learn?
- Start with the wall version (see Warrior 3 (Wall Version)) with hands flat on the wall. We had a comment from one our readers saying her students found the wall version too challenging. But if it’s too hard to lift one of your legs up parallel to floor, you can try lifting it up a tiny bit or even just coming onto the toes of one of your feet so more weight is on one leg. That’s still the pose!
- Keep practicing the wall version until it’s relatively easy and you can maintain comfortably at least 30 seconds. (If you are not lifting your leg all the way or up or even off the floor, keep practicing until you finally do.)
- Now try practicing with your hands on the wall to fingertips. Work with this version until you can maintain comfortably for at least 30 seconds.
- Now try the pose away from the wall for just a brief moment, keeping your torso and leg at angle (not coming full parallel). Yay, you did it! Work with this version until you can maintain comfortably for at least 30 seconds.
- Experiment with the full pose as we will show it later this week. Start with the easiest version first (arms back), the middle version next (arms out to the sides) and work up to the hardest version last (the full pose). Work through each version the same way, starting with a brief hold and than working up to a longer hold.
- Once you learn the pose, keep practicing it on a regular basis!
Thursday, October 11, 2012
Featured Pose: Warrior 3 (Wall Version)
by Baxter and Nina
Warrior 3 is the third pose in our upper body strengthening series because this pose provides unique upper body strengthening with little or no weight bearing on your hands. Before providing instructions on how to do the full pose (coming soon), which can be quite challenging, we’re providing an alternative using the wall that is accessible to almost everyone.
Warrior 3 is unique in that in this pose you keep your torso, arms, and one leg parallel with the floor. In this position, gravity challenges you to keep yourself upright instead of folding over your front leg. All the musculature on the back of your body has to work actively to keep you in this position, including your hamstrings and buttocks along with all the spinal muscles up to the base of your neck. You are also building strength the arm muscles required to keep your arms overhead (the position known as flexion), including trapezius, anterior and posterior deltoid, serratus anterior.
To enhance the strength building aspect of the pose when you are using your hands on the wall, use the lightest touch possible on the wall so your arms still have to work to hold themselves up. Touching the wall with just your fingertips is the most effective, but you can still gain strength building with your palms lightly on the wall if you prefer full contact with the wall for support, balance, or even just a sense of security.
Instructions: Start by facing a wall, standing about one foot away. Place your hands on the wall shoulder-distance apart, either with palms or your fingertips on the wall. Depending on your hamstring and hip flexibility, your hands should be somewhere between shoulder height and elbow height. Next, bend your knees and push your hips back away from the wall, and, keeping your buttocks over your heels, slowly walk back until your arms and torso form one long line approximately parallel to the floor.
You are now in Half Downward-Facing Dog pose (see Featured Pose: Half Dog Pose at the Wall for photos and detailed instructions of moving into this pose). From here, push your fingertips or palms firmly into the wall as you press your sitting bones away from the wall. Then shift your left foot to the right, at the mid point between your feet, while allowing your hips to shift a little to the left so you are balancing on the left foot. Then swing your right leg up and back, in line with your arms and torso.
Be careful to avoid letting your chest sink toward the floor, because hanging from your shoulder joints puts a lot of strain on them. Instead of feeling a stretch in the shoulders, you want a feeling of even strength around your shoulder joints. So think about lifting your chest up into your shoulder blades, as opposed to dropping your chest down toward the floor and aim for a feeling of completely parallel line (if you are flexible) or an even slope (if your hamstrings are tight).
One you’re in the pose, try lightening the press of your hands on the wall so you can feel the work of your back body’s musculature keeping you in position. With your raised foot slightly pointed, lengthen through your hell away from the wall. Start by staying in the pose for six breaths or so and gradually over time work your way up to 1.5 to 2 minutes.
To come out of the pose, release your right leg down to the floor, bend your knees, and walk in toward the wall. Repeat on left other side.
Cautions: This pose requires a lot of back strength, so if you have lower back issues, you may need to modify the pose by placing your hands higher on the wall or by keeping your lifted leg slightly bent. If you have a hamstring strain, if you feel any strain in the standing leg, bend it slightly so you don’t aggravate your injury.
Subscribe to:
Posts (Atom)


